In the first post in the series we learned what symbolication is and how it works, the second post taught us how to use Apple provided tools and helper scripts to symbolicate frames or full crash reports. The following post focuses on more advanced topics.
What is bitcode?
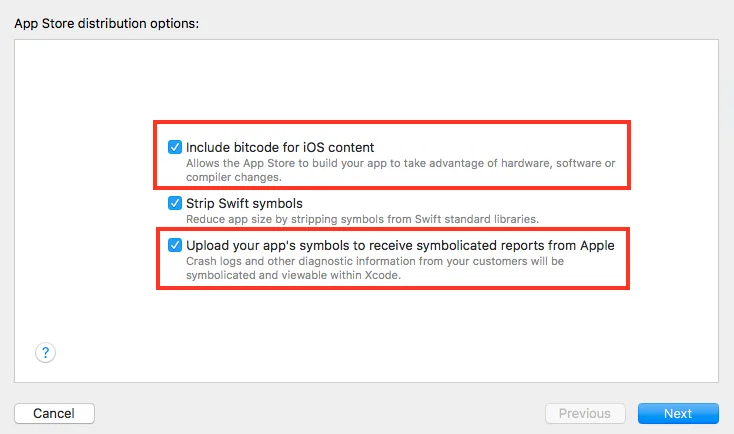
Remember how we said your Swift or Objective-C code is compiled into ARM or x86 machine code? Well, that is not entirely accurate. Before producing actual machine code, compiler first creates an intermediate representation of the code called bitcode. It is not your code, bot not yet a machine code either. If you chose to enable bitcode in your project options and to upload bitcode to iTunes connect, Apple can actually recompile your application on their servers while applying the latest and greatest compiler optimizations. Even after you’ve stopped maintaining your app and not uploading new versions, they can still continue to optimize your binary as new compiler features are introduced. The problem with this approach is, of course, the dSYM files that were generated in your Xcode locally do not match the binaries that your end users are getting, meaning your users’ crashes can not be properly symbolicated neither locally nor by a third party crash report tool such as Bugsee.
There is a further complication to that process. Even though we are uploading bitcode to Apple servers, we may decide not to upload the actual symbol names. In that case the dSYM files generated on Apple servers will point to the right file and line number, yet the method names will look something like __hidden#12345 and thus will not be very helpful.

How do I obtain proper dSYM files?
For now, let’s assume that we did allow Xcode to upload symbol maps to iTunes connect as well. In this case, Apple did rebuild the binary from bitcode on its server and new dSYM files with proper symbols were generated. There are two ways to download these dSYM files directly from Apple servers:
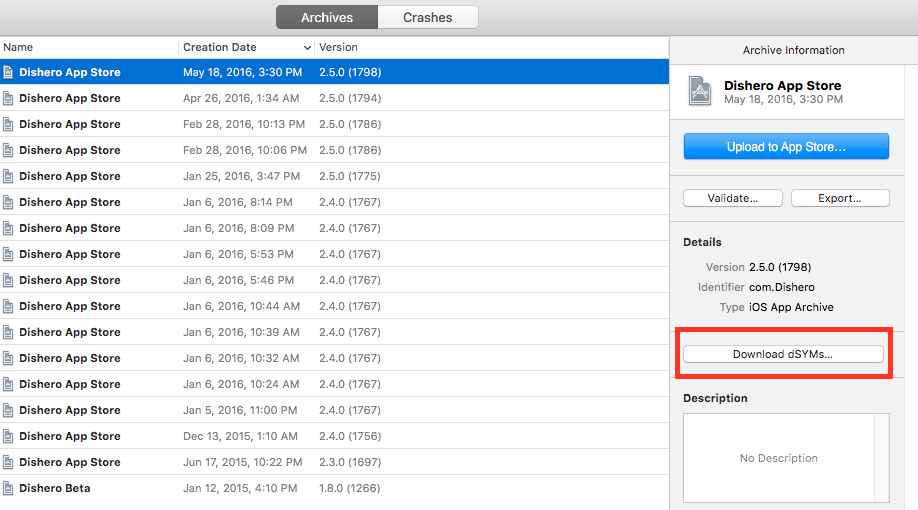
Downloading dSYMs using Xcode
This approach assumes you’ve been building locally and have the archive still in your Xcode. In Xcode organizer, choose the archive and the build you want to download dSYM files for and click on Download dSYMs button.
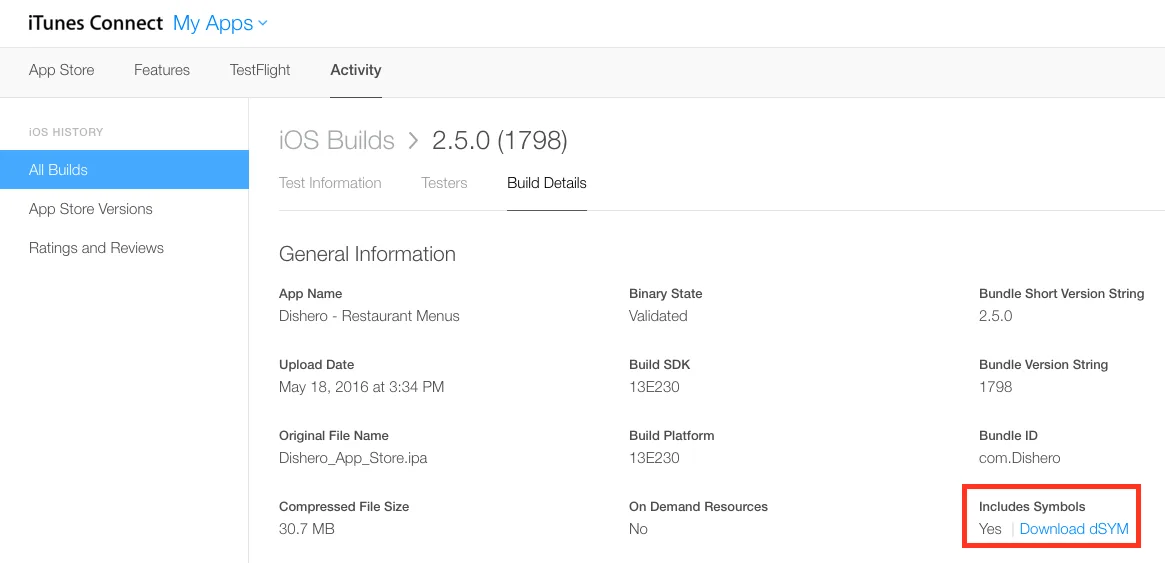
Downloading dSYMs using iTunes Connect
An alternative approach is to download it directly from iTunes Connect. It might actually be the only option if CI is used to build the application automatically on a server and there is no access to Xcode.

Is there any way to automate it?
Luckily there is. But it is currently available only as part of the fastlane automation framework. Fastlane can handle all the tedious tasks, like generating screenshots, dealing with code signing, and releasing your application. It can also help automate the task of downloading the right dSYM files from Apple and uploading them to a crash reporting tool of your choice. Setting up and configuring Fastlane is outside the scope of this tutorial. Once it is set up for your project, configuring dSYM file downloading and auto-uploading is as easy as creating the following lane in your project’s Fastlane file:
lane :refresh_dsyms do
  download_dsyms                  # Download dSYM files from iTC
  upload_symbols_to_bugsee(       # Upload them to Bugsee
        app_token: "<app token rel="noopener noreferrer">",
  )
  clean_build_artifacts           # Delete the local dSYM files
end
And running it with:
fastlane refresh_dsymsWe’ve used Bugsee‘s upload_symbols_to_bugsee action as an example here, this action is available through a fastlane plugin, which can be installed by running the following command:
fastlane add_plugin bugseeYou can read more about fastlane’s dSYM supported actions here.
Fixing obfuscated dSYM files with .bcsymbolmap?
So what can we do when the Include app symbols was not checked when we uploaded to iTunes Connect. The dSYM that we downloaded in the previous step actually have these useless __hidden#123455 symbols. If we are on the machine that created the original build and or we have the .xcarchive we might be still in luck.
That missing piece is called a symbol map. That is an additional file that is being generated by Xcode as part of the archiving of the app and it can be found in the BCSymbolMaps folder within the archive. It is possible to re-inflate the obfuscated dSYM file manually using these symbol maps using the following command:
dsymutil --symbol-map <bcSymbol-file> <symbolless-dsym-file>Automating this step within a fastlane pipeline is also possible, and some 3rd party crash reporter services, including Bugsee, build it in into their plugins, so it can be easily enabled with a single switch:
lane :refresh_dsyms do
  download_dsyms                  # Download dSYM files from iTC
  upload_symbols_to_bugsee(       # Upload them to Bugsee
        app_token: "<app token rel="noopener noreferrer">",
        symbol_maps: "bcsymbolmaps/folder"
  )
  clean_build_artifacts           # Delete the local dSYM files
end
Bitcode and Ad-Hoc, Enterprise and MDM distributions
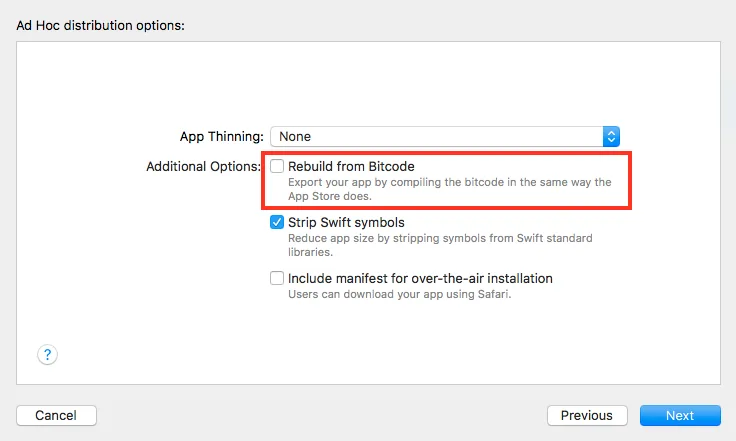
When distributing the application through various Ad-Hoc configurations, the actual binary image is being distributed (i.e. arm64). The original dSYM files generated during the build should work just fine and match that binary. Except that Xcode has an additional option that recompiles the binary code from bitcode again. This will again result in that final binary not matching the original dSYM:

Even though it is possible to use the newly generated dSYM files and re-inflate them with symbols using the BCSymbolMaps symbol maps, usually a much simpler option is not to enable that option in the first place. If we automate our build process using fastlane gym, this can also be achieved by using a custom option to the export function:
gym(
  ...
  export_options: {
    ...
    compileBitcode: false
  }
)
Conclusion
This was the final post in the series. We’ve learned what is symbolication, how to do it manually, how to automate it and how to deal with more complex build pipelines, involving bitcode and server side recompilation. All this provides us with means to understand where exactly in the code the crash happens. Yet, for some bugs, even that is not enough. Knowing the final location of the crash in the code doesn’t give us enough context to understand how the application got to that state in the first place. That is exactly where Bugsee is different from other crash reporters. In additional to automating the symbolication process by dealing with all the cases we’ve discussed above, it also provides a recording of everything that happens prior to the crash, including the video of the screen, user touches, network traffic, console logs and much more.

