React Native is one of the most widely used frameworks for building cross-platform mobile apps. Although React Native supports multiple platforms, it’s most commonly used for Android and iOS development. It lets developers write a single codebase that runs on both iOS and Android, speeding up development without sacrificing performance or user experience.
But when it comes to deployment, things get more complex. Getting your app ready for release involves more than just building and publishing. You’ll need to navigate platform-specific requirements, use the right deployment tools, follow app store guidelines, and meet industry standards to avoid rejections or delays.
Whether you’re an experienced developer or just getting started, this guide walks you through the key steps you need to know about deploying React Native apps—from setting up your environment and generating production builds to publishing on the App Store and Google Play.
Understanding React Native Deployment
Mobile app development doesn’t stop once the code is written. Deployment is the next critical phase, which involves steps and configurations required to package, distribute, and publish your mobile app to end users via platforms like the Apple App Store and Google Play Store.
Unlike traditional native development, React Native lets you write a single codebase in JavaScript or TypeScript and deploy it across multiple platforms – Android, iOS, Web, Windows, and macOS. So while it simplifies much of the native development complexity, you still need to navigate specific configurations and toolchains in order to deploy your app for each platform.
Deployment Strategies for React Native Applications
React Native gives you two primary deployment approaches: managed workflow and the bare workflow.
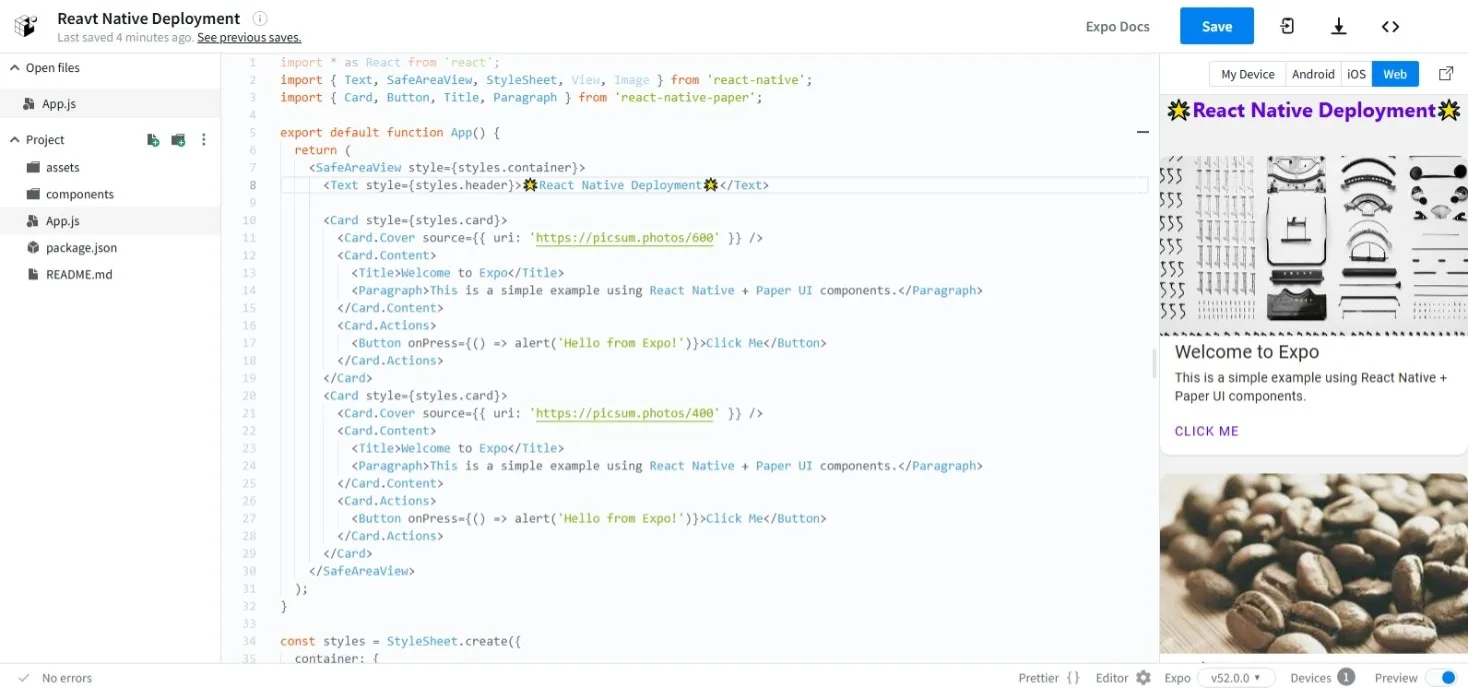
The managed workflow – typically used with Expo – takes care of native configurations, making it easier to build and release your app without diving into Xcode, Android Studio, Gradle, or native dependencies. It’s like having a simplified, all-in-one tool that lets you focus on building your applications without worrying about the underlying traditional development and deployment complexities.
The bare workflow, on the other hand, gives you full access and control of your project details, platform-specific behavior, third-party SDK integrations, and build optimizations. It is simply the approach where you manage the entire native project yourself, without relying on managed services like Expo.
For most standard apps, Expo’s managed workflow is often the more straightforward option. However, for enterprise-grade applications that require deeper customizations, the bare workflow offers the flexibility needed to fine-tune native modules and settings.
Choosing the Right Development and Deployment Environment
As mentioned earlier, each platform requires specific tools and IDEs to generate final release builds. React Native offers two primary deployment approaches, and it’s important to choose one early in your development process: the default CLI-based workflow or the Expo framework.
The Native approach is the traditional setup. It uses locally installed tools like Xcode and Android Studio, offering full control and easier integration with native modules. However, it also involves more manual configuration and setup on your local machine.
In contrast, Expo provides a cloud-based, all-in-one development and deployment solution. It simplifies the process through a managed workflow, eliminating the need for Xcode or Android Studio. That said, Expo may limit access to certain native APIs unless you eject your app from the managed workflow to switch to the bare workflow.
Preparing for Deployment: Essential Steps
Before the deployment step, it is important to make sure your code is stable and production-ready. Start by checking for errors and bugs – either manually or with debugging and crash reporting tools like Bugsee. Next, make sure all production assets, such as app icons, splash screens, and configuration files (like app.json or Info.plist), are correctly updated. Your app must be properly signed with valid credentials using secure signing keys stored in a keystore (for Android), or provisioning profiles (for iOS). Finally, it’s crucial to remove debugging artifacts, console logs, and testing libraries to reduce overhead and mitigate potential security risks.
Understanding application store policies is also essential for a successful deployment. Both Apple and Google have strict security and technical rules for app submissions – and even small oversights can lead to rejection. This is because both stores require high app quality and standards to ensure that apps are functional, secure, and meet user expectations.
For iOS, your app must follow Apple’s Human Interface Guidelines, including clear privacy disclosures. Specific permissions – like access to the camera, location services, or background tasks – must be explicitly declared and justified with well-defined use cases.
Android has its own set of requirements for developers, which can be found in the Android Developers Guide, and adhering to data safety declarations, target API levels, and content policies is a must. Moreover, you’ll need to provide complete and accurate metadata, such as descriptions, screenshots, and feature graphics, that help ensure your app passes through Google’s automated and manual checks.
Skipping these prerequisites can lead to failed builds or rejections from the app marketplaces.
Deploying Using Expo
When choosing Expo, you’ll work with various tools and terms associated with its managed workflow, such as EAS, Expo Go, and Expo CLI. These tools provide a comprehensive, all-in-one solution that supports every step, from initial development to publishing on the App Store or Google Play.
- Expo: The main framework for building React Native apps with a set of tools, libraries, and services that simplify the development process. It includes the Expo SDK, Expo CLI, and Expo Go for development and testing React Native apps.
- Expo CLI: The command-line interface for interacting with the Expo platform, used for creating projects, running apps, and using services like EAS.
- Expo Go: A mobile app that allows you to preview your Expo project on iOS or Android without needing to build or deploy it. It’s used for testing during development by scanning a QR code from the development environment.
- EAS (Expo Application Services): A set of cloud-based services (including EAS Build, EAS Submit, and EAS Update) that allow developers to build, update, and submit apps to app stores.
Expo and EAS are integrated within the same ecosystem rather than being separate tools or environments. While the core Expo framework is completely free, EAS offers both free and premium plans. The paid plan provides enhanced capabilities, including faster builds, priority support, storage, and additional advanced features that streamline the deployment process.
Step-by-Step Guide to Deploying a React Native App with Expo and EAS
Here’s an overview of the steps you need to take to develop and deploy a React Native app using the managed workflow of Expo:
- Set up your environment: Install Node.js and npm (or Yarn), then install Expo CLI with
npm install -g expo-cli. Use VSCode or your preferred IDE. - Create a new project: Run
expo init my-appin the terminal, choose a template, and navigate to the project folder withcd my-app. - Write your code: Code the app in VSCode or edit files like App.js and modify app.json for app settings.
- Start the development server: Run
npx expo startin the terminal to launch the server. - Test your app: Open Expo Go on your device, scan the QR code, and see live updates as you edit your code.
- Set up EAS: Run
eas build:configurein the terminal to create aneas.jsonfile for build settings. - Build the app: Run
eas build --platform iosoreas build --platform androidto trigger the build process. Track the build in the terminal or Expo Dashboard. - Download the build: Once the build completes, download the .apk or .ipa file from the provided link in the terminal or Expo Dashboard.
- Submit to app stores: Run
eas submit --platform iosoreas submit --platform androidto upload your app to the app store. Expo will handle submission details such as credentials and metadata during the process. - Deploy OTA updates: Use
eas update --branch productionto push updates without rebuilding the app. You can manage updates via the Expo Dashboard.
Expo Pros and Cons
Expo simplifies the deployment process by abstracting away complex build configurations, managing asset bundling, and supporting over-the-air (OTA) updates – all of which allow for faster iteration without needing to resubmit to app stores.
That convenience, however, comes with trade-offs. While Expo’s managed workflow helps developers with early-stage development, it restricts access to custom native modules and advanced configurations unless you eject to the bare workflow again. Larger production apps can also run into compatibility issues when trying to integrate SDKs outside the Expo ecosystem.
Expo is a solid choice for teams that focus on prioritizing speed, simplicity, and standardized tooling, but if your project requires advanced device-level integrations, native performance tuning, or specialized background services, the bare workflow would be the better fit.
Deploying React Native Apps in Bare Workflow
For apps that need full control over the build process, deploying natively on your device using React Native’s CLI is a better approach. Here’s how the process breaks down:
- Preparing the App for Release
- Update configuration files (like App.js and package.json) with the correct production settings.
- Remove debug logs and unused dependencies to reduce app size and improve performance.
- Setting Up iOS Deployment
- Open the project in Xcode and configure the signing and provisioning profile.
- Set the build scheme to ‘Release.’
- Package a signed, production-ready version of your app, including all necessary metadata, screenshots, and assets.
- Upload the archived build to App Store Connect for distribution via TestFlight or App Store submission.
- Configuring Android Deployment
- Open the project in Android Studio and configure and sign it.
- Set the build scheme to ‘Release.’
- Generate a signed APK or AAB using Gradle and Android Studio.
- Get the necessary dependencies like metadata and screenshots ready.
- Upload the build to the Google Play Console and complete the publishing steps.
Key Differences Between iOS and Android Deployment Natively
When it comes to deployment, iOS and Android differ significantly due to platform-specific tools, policies, and technical requirements. Here are some key differences:
- Build Tools: Android uses Gradle and Android Studio, while iOS relies on Xcode.
- App Signing: iOS requires a certificate and provisioning profile that defines developer identity and permitted devices. Android uses keystores and signing configurations.
- Distribution Formats: Android apps are packaged as APK or AAB files, whereas iOS distributes apps via .ipa files.
- App Store Submission: iOS submissions typically go through a longer review process compared to Android.
- Device Testing: iOS apps can be tested on simulators for early checks, but should also be tested on real devices (typically using TestFlight), for more accurate validation. Android offers more flexibility, allowing testing on both emulators and physical devices, with emulators often being sufficient for most scenarios.
Detailed Guide to Native iOS Deployment
This section provides a step-by-step breakdown of each part of the deployment process for iOS using Xcode, from creating an app bundle to publishing the app on the App Store.
Configuring Xcode for Release Builds
Start by opening your project in Xcode and selecting the Release build configuration in the scheme settings inside the IDE. In the Build Settings tab, ensure that optimization flags are enabled (-O) and disable Bitcode if you’re not targeting older devices.
Next, head to the Signing & Capabilities tab and attach the correct Apple Distribution Certificate and App Store provisioning profile. These must match the credentials registered in your Apple Developer account. Ensure the Info.plist file includes mandatory fields such as NSCameraUsageDescription or NSLocationWhenInUseUsageDescription if your app accesses device features. Also, double-check that the app icon, launch screen, and build number are all set correctly.
Once everything is configured, you’re ready to generate the final app bundle.
Creating an iOS App Bundle for Distribution
An iOS app bundle is the compiled output file of your React Native application, packaged with required metadata, assets, and code signatures required for App Store submission.
Once your Xcode project is properly configured, go to Product > Archive to begin the build process. When the archive is complete, Xcode will automatically launch the Organizer window.
In the Organizer, you can validate the build to catch any provisioning and entitlement issues before exporting the file or uploading it to App Store Connect. Be sure that the correct Bundle Identifier, Version Number, and Build Number are correctly set in the project’s General settings.
Publishing to the Apple App Store: Best Practices
To publish your app to the App Store, you’ll first need to enroll in the Apple Developer Program, which requires a $99 annual subscription and account verification. Once enrolled, log into App Store Connect and create a new app record by providing your app’s name, primary language, bundle ID, and SKU.
Next, upload the archived build from Xcode directly to App Store Connect using the Organizer’s Distribute App option. Once uploaded, attach the build to your app version and fill in the required metadata (app description, keywords, support URL, age rating, etc.). You’ll also need to upload high-resolution screenshots for every device size you plan to support. Finally, configure pricing and availability settings, and then submit your app for review.
Avoid submitting placeholder or incomplete builds just for testing – Apple’s review team checks for both technical compliance and overall app quality. A complete, well-prepared submission helps prevent delays and increases your chances of publishing your app.
Step-by-Step Process for Android Deployment
Deploying a React Native app to Android follows a similar structure to iOS. The process generally involves three key steps: configuring Gradle and Android Studio, generating the final APK or AAB file, and submitting the app to the Google Play Store.
Configuring Gradle for Android Builds
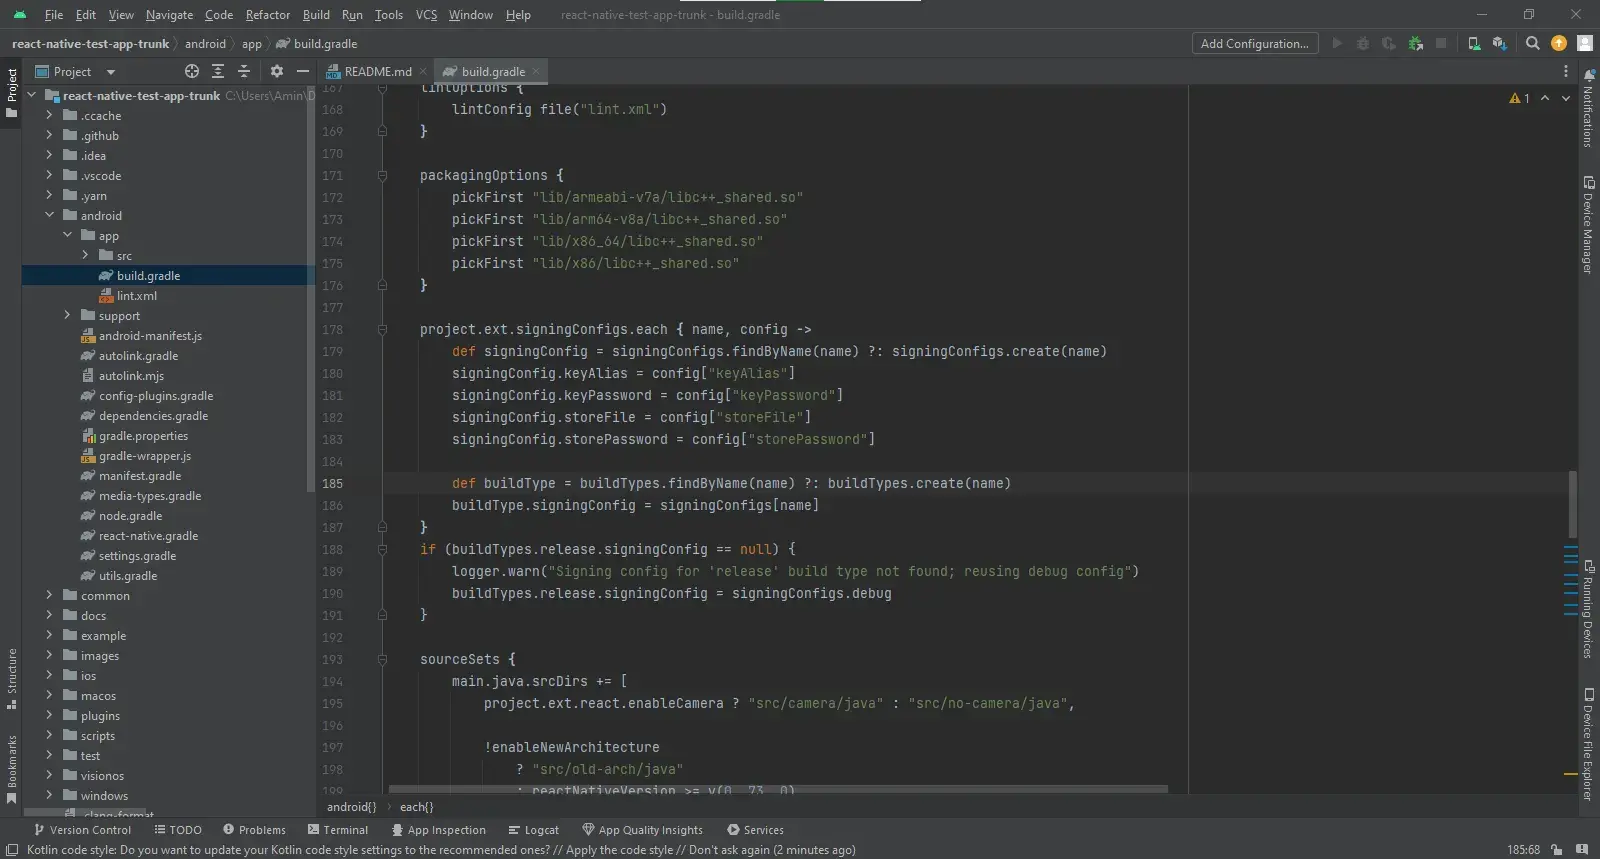
Once your app is ready and Android Studio is set up, the next step is to configure Gradle – the core build system for Android. A properly configured build.gradle file is crucial for generating optimized, production-ready builds.
In particular, you’ll want to define your build types clearly. Within the release block, settings such as minifyEnabled true, shrinkResources true, and references to proguard-rules help reduce app size and improve performance. Here’s a practical example of a release configuration:
buildTypes {
    release {
        minifyEnabled true
        shrinkResources true
        proguardFiles getDefaultProguardFile('proguard-android-optimize.txt'), 'proguard-rules.pro'
    }
}
Versioning should be handled systematically using fields like versionCode 12 and versionName "2.1.0" – both of which are required for managing releases on the Google Play Store.
You can also fine-tune performance and compatibility through the gradle.properties file, where configurations like org.gradle.jvmargs=-Xmx2048m, android.useAndroidX=true, and android.enableJetifier=true help optimize the build process and ensure support for modern libraries.
These are just a few examples of Android-specific files and codes to configure the Gradle build system before generating a release application file in Android Studio.
Generating Release APKs and AABs
Before publishing, you need to generate production-ready build files, either an APK (Android Package) or AAB (Android App Bundle). Google Play now recommends AAB, as it enables Play Store to deliver optimized APKs for different devices automatically.
Here’s how to generate a release build:
- Update the build.gradle file as mentioned above
- Create a signing configuration: Generate a keystore using the command:
keytool -genkey -v -keystore my-release-key.jks -keyalg RSA -keysize 2048 -validity 10000 -alias my-key-alias.Then, add the keystore details in gradle.properties and reference it in build.gradle. - Generate APK or AAB: In Android Studio, navigate to Build > Generate Signed Bundle / APK > Choose APK or AAB > Configure > Finish. Alternatively, you can use CLI commands like
./gradlew bundleReleaseor./gradlew assembleRelease.
Publishing to Google Play Store: A Comprehensive Overview
The process of publishing an app on Play Store begins with creating a Google Play Console account (developer account), which requires a one-time $25 registration fee and authentication. Once your account is active, you’ll move on to preparing the app listing. This includes providing core metadata such as the app title, short and full descriptions, at least two screenshots, a 512×512 pixel app icon, and a 1024×500 pixel feature graphic.
The next step is uploading the release build. In the Play Console, go to the Production track under the Release section, create a new release. Upload your signed AAB file, and review any warnings flagged by the console before proceeding.
Beyond the technical deployment, several compliance and content requirements must be addressed. These include completing the Data Safety section, defining your Target Audience, linking to your Privacy Policy, and answering Google’s content rating questionnaire. You’ll also need to configure pricing and distribution settings by selecting the countries or regions where your app will be available.
Once everything is in place, click “Review and Publish.” Google’s review process usually takes anywhere from a few hours to a few days, depending on your app’s category, features, and content.
Real-World Deployment Challenges and Solutions
Even with solid tools and well-defined workflows, deploying a React Native app can present real-world challenges. Developers often run into issues like build inconsistencies, platform-specific bugs, version mismatches, and unexpected store rejections.
This section explores some of the most common deployment problems and offers practical solutions to help you navigate them more smoothly.
Addressing Common Deployment Issues
One common issue is build inconsistency across development, staging, and production environments. This often results from mismatched dependencies, native module conflicts, or platform-specific configuration differences. A strong CI/CD pipeline with automated testing can catch these problems early and help maintain consistency across all builds.
Another challenge is secure distribution. Android builds require careful handling of signing keys and keystore files, while iOS depends on properly configured provisioning profiles and certificates in Xcode. Mismanaging these credentials can lead to failed builds or security risks. Using secret management tools like GitHub Actions Secrets or Google Cloud Secret Manager – and automating signing processes – can help keep credentials secure and deployment smooth.
Version control can also become tricky, especially when users are running different versions across devices. Without proper tracking and update mechanisms, compatibility issues can surface. Implementing version enforcement and maintaining a clear versioning strategy helps reduce these risks.
Finally, post-release monitoring is key. Tools like Sentry, Firebase Crashlytics, and Bugsee track errors, crashes, and performance problems, helping teams improve the app over time and streamline future deployments.
Setting Up Your Development Environment
Setting up the environment is more than just installing Node.js or code editors. You’ll need to align versions across key components like the React Native CLI, Xcode, Android Studio, Java Development Kit (JDK), and platform SDKs. These tools also need to be correctly linked in your system’s environment variables and PATH settings to avoid build failures caused by missing dependencies or conflicts. Finally, configuring emulators and testing on physical devices is key to catching issues that might not appear during development.
Security Best Practices for React Native Apps
React Native developers must secure both client-side code and network communication pathways. Sensitive logic or credentials should never be embedded directly in the app bundle – instead, use secure environment variables and encrypted storage mechanisms. API calls must be protected through HTTPS with token-based authentication or OAuth flows.
Additionally, code obfuscation tools like ProGuard (for Android) and Bitcode configurations (for iOS) can reduce reverse engineering risks. Sometimes these security risks, especially in large-scale apps with a large user-base, could cause problems or face rejection from the stores while deploying and publishing.
Managing Version Control and Updates
As mentioned above, keeping track of app versions is important to avoid bugs, reduce user problems, and maintain a smooth release process. In React Native, one common challenge is keeping native code updates (like changes to iOS or Android components) in sync with over-the-air (OTA) JavaScript updates. Not everything can be fixed with an OTA update; if the update includes changes to native code or third-party libraries, you’ll need to publish a full update through the App Store or Google Play. It’s a good practice to use clear version numbers (like 1.2.0) to track changes.
Enhancing App Performance Post-Deployment in React Native
Once your app is live on the App Store or Google Play, post-deployment efforts become essential for maintaining performance and preparing for future releases. Built-in analytics tools from both platforms offer valuable insights into user behavior, device-specific performance, and crash reports. These data points can help you quickly identify issues and make informed decisions about future deployments and updates.
CI/CD tools can also support your post-launch workflow by automating tasks like testing, monitoring, and triggering updates. Combining analytics and CI/CD automation creates a smoother and more efficient React Native app deployment experience, ensuring both high performance and a streamlined process for future releases.
Continuous Integration and Continuous Deployment (CI/CD) Explained
Implementing CI/CD in React Native projects makes it easier for developers to automate build, testing, and release workflows, resulting in less manual overhead and fewer human errors.
CI tools like GitHub Actions, Bitrise, or CircleCI can be configured to automatically run test suites or trigger build pipelines whenever code is pushed to your repository. For deployment, these pipelines often integrate with Fastlane or EAS CLI to package and upload builds directly to the app stores.
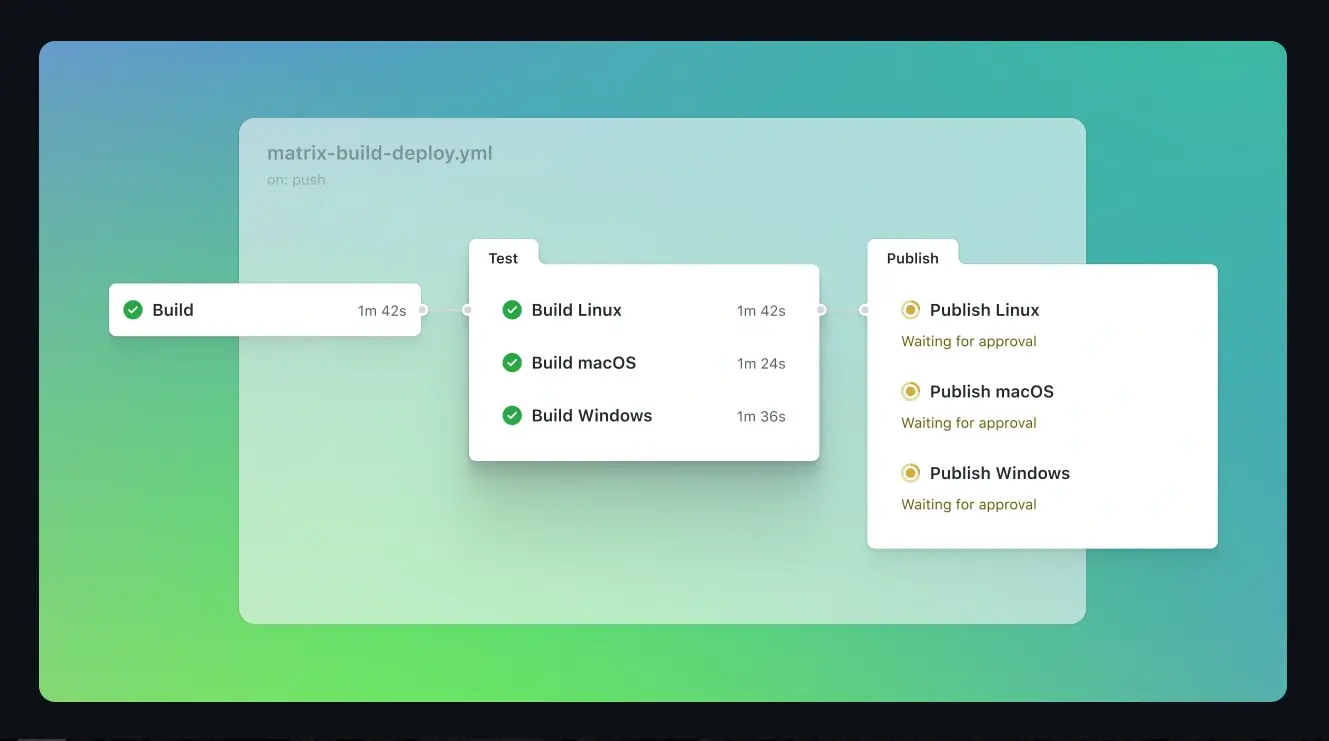
CI/CD tools also support environment-specific configuration files, making it easy to create separate builds for staging, QA (Quality Assurance), and production. This allows teams to test and iterate faster, especially during feature development or sprint cycles. Automating tasks like code signing, setting version numbers, and creating build files can also significantly streamline the development workflow.
Trends in React Native Deployment
As React Native continues to evolve, so do the tools, workflows, and practices surrounding the deployment process. Today, technological trends are coming up or growing with new practical tools to reshape deployment strategies and offer new perspectives on how teams can align with the future of mobile development.
Services like EAS (Expo Application Services) are redefining build automation and OTA updates by simplifying complex release processes. CI/CD platforms such as GitHub Actions and Bitrise are improving release consistency while reducing manual overhead. Additionally, innovations in runtime environments, like Hermes engine optimizations and JSC upgrades, are directly influencing performance and deployment stability. At the same time, edge functions and serverless architectures are becoming more common, shifting processing to the cloud to reduce device load and enable faster, more dynamic content delivery.
Cloud services can also simplify and accelerate deployment for React Native apps. They support key backend tasks like hosting APIs, managing authentication, storing data, and setting up CI/CD pipelines – reducing the need for manual infrastructure management. Platforms like Firebase and Back4App offer ready-to-use features such as real-time databases, serverless functions, cloud storage, and messaging systems. By offloading backend operations to the cloud, developers can scale faster and avoid rebuilding infrastructure with every deployment.
As React Native apps evolve across platforms, staying ahead of deployment trends is key to building competitive, future-ready products.
Conclusion
Deployment isn’t a one-time task – it’s an ongoing part of maintaining and improving your React Native app. With the tools, strategies, and best practices covered in this guide, you’re well-equipped to choose a deployment approach that fits your technical needs and project goals.
Start by evaluating where your project currently stands. Are you targeting Android, iOS, or both? Think about how your development process fits into your release timeline, and which tools or deployment strategies help you for faster updates and easier rollouts.
From here, your next step might be exploring deployment strategies in more depth or choosing the tools mentioned in this article to begin the deployment process with confidence.