When testing an Android app, distributing it to testers outside the Google Play Console can sometimes make the process faster and more flexible. In this guide, we’ll explore how to share your app with testers using alternative methods, why you might need them, and how to set up a seamless update process.
Why Distribute Outside the Google Play Console?
Here are some common reasons why you might prefer an alternative to the Play Console for testing distribution:
- Regional Restrictions: If your testers are in regions where the Play Store isn’t available, a direct distribution method can help you bypass these limitations.
- Early Development Stages: If your app is in its early testing phase, you might not want to go through Google’s approval process yet.
- Control Over Testing: For internal or corporate apps, you may need more control over who can access the app and how feedback is handled.
- Quick Iterations: Avoiding Play Console delays can help you release new test versions to your team faster, making for a more efficient feedback cycle.
Now, let’s look at three main ways to distribute your app without using the Google Play Console.
Comparing Options for Distributing Android Apps to Testers
When it comes to distributing your Android app for testing without using the Google Play Console, there are three main options: self-hosted solutions, third-party platforms, and direct APK distribution. Each method has its unique features, pros, and cons. Let’s dive into each approach and see how they compare.
1. Self-Hosted Solutions
With a self-hosted solution, you use your own server or a cloud storage service (like Amazon S3) to distribute your app to testers. For instance, with S3, you can upload your APK files and generate a download link that you share with testers, allowing them to download the app directly from your chosen storage.
Key Features:
- Full Control: You manage all aspects of distribution, access, and updates.
- No Dependency on Third Parties: Because everything is hosted on your servers or cloud, you don’t rely on third-party testing platforms.
Considerations:
- No Built-In Analytics: Self-hosting doesn’t provide analytics on app usage, crashes, or feedback. You’ll need other tools to gather this information.
- No Auto-Update Options: To update the app, testers need to manually download new versions unless you implement a custom update mechanism.
Best For: Companies needing full control over app distribution, such as internal teams or corporate environments with specific security or compliance needs.
2. Third-Party Platforms
Third-party platforms, such as Firebase App Distribution or Microsoft App Center, provide a centralized way to manage app distribution, updates, and tester feedback. These platforms are specifically designed for testing, allowing you to build an efficient CI/CD pipeline and streamline your app testing process.
Key Features:
- Automation and CI/CD Integration: These platforms integrate easily with CI/CD pipelines, so you can automatically build, test, and distribute new versions.
- Built-In Analytics: Get insights into app performance, crash reports, and feedback.
- Tester Management: Invite testers, manage permissions, and control app access. You can even assign different tester groups to specific releases.
- Version Control and Auto-Updates: Notify testers of new versions automatically and allow them to update directly from the platform.
Considerations:
- Potential Costs: These platforms may have associated costs, especially if you’re managing larger testing teams or complex workflows.
Best For: Teams looking for automation, centralized testing management, and analytics, making it ideal for apps that require multiple releases and extensive testing.
3. Direct APK Distribution
Direct APK distribution is a straightforward approach where you manually share the APK file with testers. This can be done via email or file-sharing services (like Google Drive).
Key Features:
- Simple Setup: No complex setup is required, making it easy to get your app into testers’ hands quickly.
- Flexible Sharing Options: You can choose any file-sharing method that suits your team’s needs.
Considerations:
- Higher Security Risks: There’s a higher chance of APK tampering or unauthorized distribution if the link is shared beyond the intended group.
- Manual Installation: Testers need to enable installation from unknown sources on their devices, which can be cumbersome.
- No Analytics or Update Management: Direct sharing doesn’t provide crash reports, analytics, or automatic updates, making it harder to manage feedback and new versions.
Best For: Small teams or quick, limited-scope testing where simplicity is key, and security or update management isn’t a primary concern.
Summary Table: Comparing Distribution Options
| Option | Pros | Cons | Best For |
|---|---|---|---|
| Self-Hosted | Full control over access and updates | No analytics or auto-update features | Internal distribution for organizations |
| Third-Party | Automation, analytics, tester management, auto update mechanism | Potential cost | Teams needing automation and feedback |
| Direct APK | Quick and simple | Higher security risks, lacks analytics and updates | Fast, small-scale distribution |
Each distribution method has its strengths, and the best choice depends on your team’s needs and the complexity of your testing requirements. By understanding these options, you can choose the one that fits your workflow best and ensures efficient, secure testing for your Android app.
Looking for a faster way to distribute and monitor Android test builds? Try Bugsee free for 30 days – no setup headaches, just insights.
Setting up the self-hosted option
Let’s assume you’ve selected self-hosting as your ideal distribution choice. What are the steps you need to get the app ready for testers? This section will use S3 with a step-by-step guide to getting the app available to testers.
To get this done, you’ll need:
- Amazon AWS Account to access S3
- A ready APK of the Android app you wish to share.
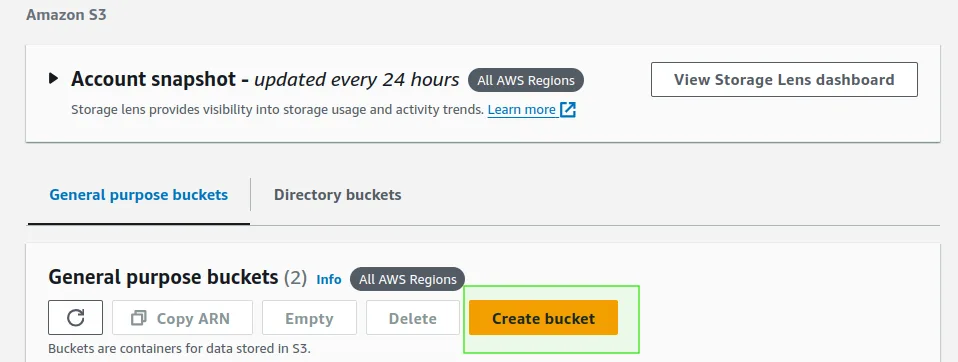
The first step is to access AWS S3 and create a new Bucket as follows:
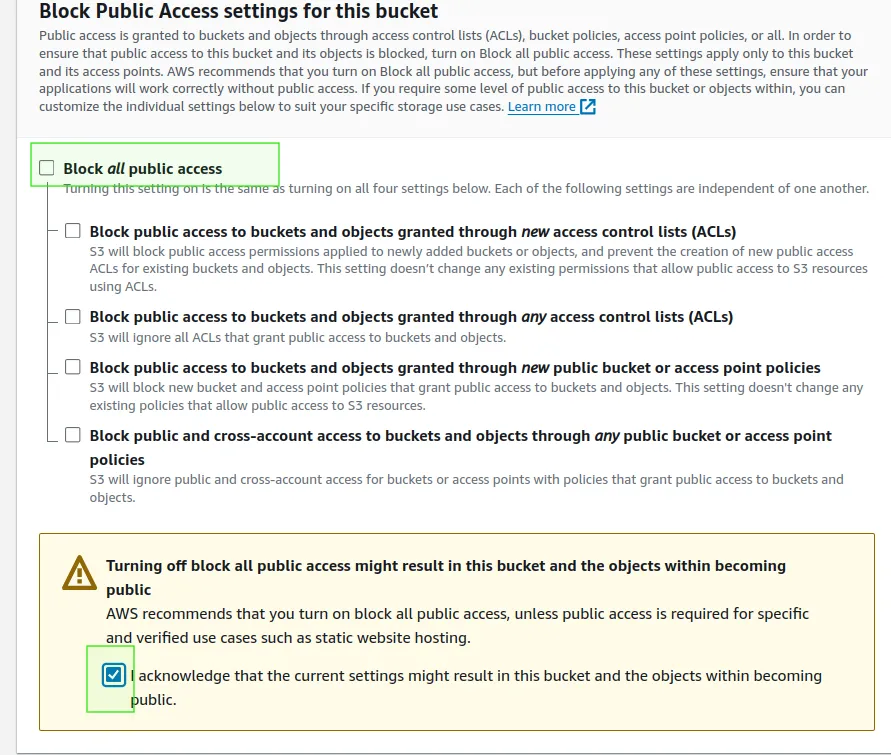
Next, provide a Bucket name. Your app will be accessed outside the AWS. You’ll uncheck block all public access and acknowledge this current setting:
If you plan to update your app and provide newer APKs, Amazon S3 offers a Bucket Versioning feature. When enabled, this feature keeps track of multiple versions of the same object within a single bucket.

However, for practical app distribution, it’s often preferable to include build numbers in the APK filenames themselves (e.g., app-v1.apk, app-v2.apk). This approach allows you to maintain and serve multiple builds simultaneously, and lets your testers easily identify and download specific ones without confusion, while S3 versioning can be used as an additional layer of backup to restore previous versions if needed.
At this point, create the Bucket, and it should be available in your existing Bucket listing:

Next, click this new Bucket, and you should have the upload page as such:

Navigate to the Upload section. It should provide you with a new dashboard to upload files and folders. Name your file and Add your APK file. Once done, your APK should be ready as self-hosted. The newly uploaded APK will be an object of the selected Bucket:

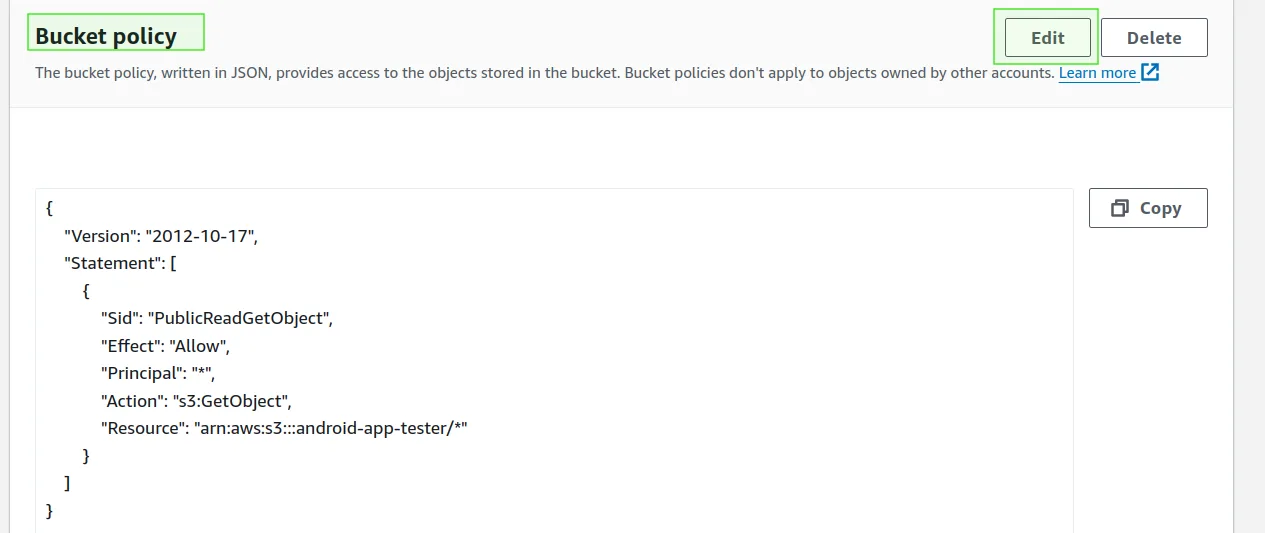
Next, create a policy resource to give the Bucket full access to this file. Go to the Permissions section and click Edit Bucket Policy. You’ll add the following and save the changes:
{
  "Version": "2012-10-17",
  "Statement": [
 {
      "Sid": "PublicReadGetObject",
      "Effect": "Allow",
      "Principal": "*",
      "Action": "s3:GetObject",
      "Resource": "arn:aws:s3:::your-app-bucket-name/*"
 }
 ]
}
Note: your-app-bucket-name should be replaced with your S3 Bucket name.
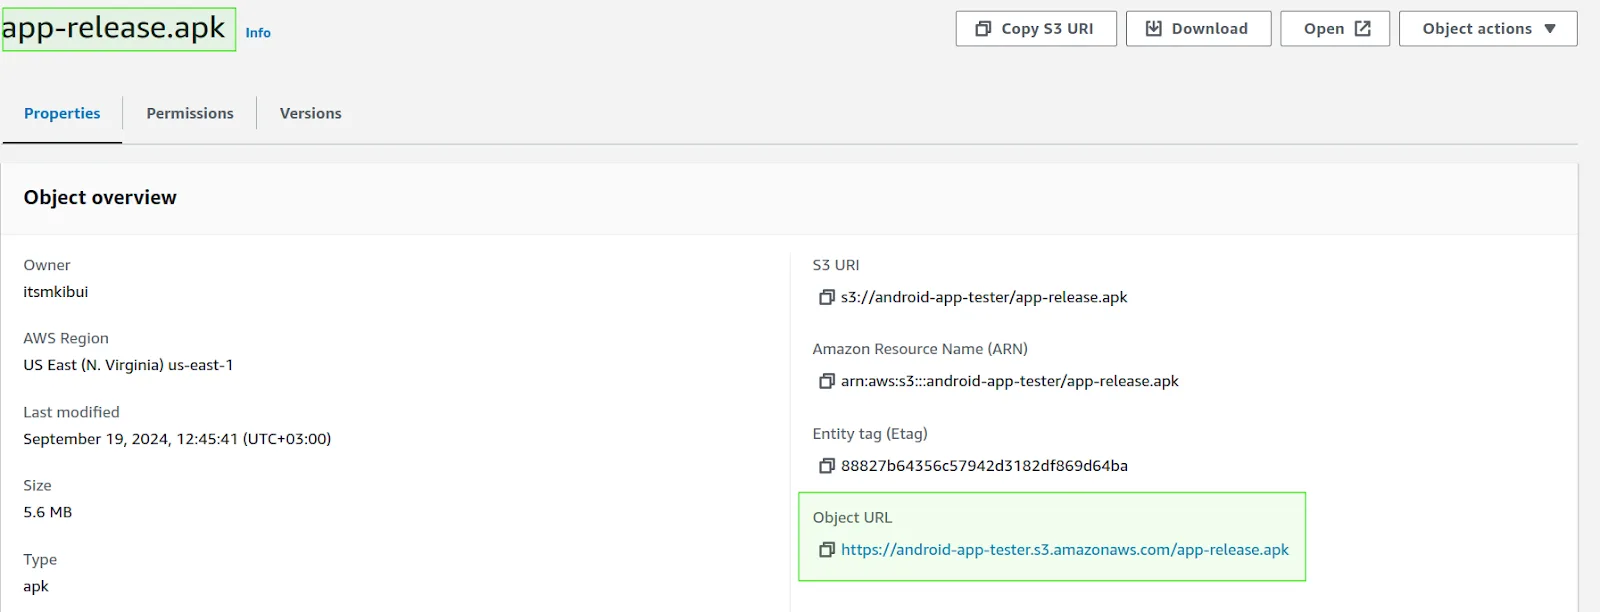
Finally, the app is now hosted on S3. Access the uploaded APK file and check the object URL. This is the URL you’ll share with testers to download the Android app. Make sure it is accessible from the web before sharing it broadly:
Auto-update after initial installation
Unfortunately, unlike a Google Play distribution path which has a built in auto-update functionality (as shown below), with a self hosted option, this needs to be implemented as part of the app functionality itself.
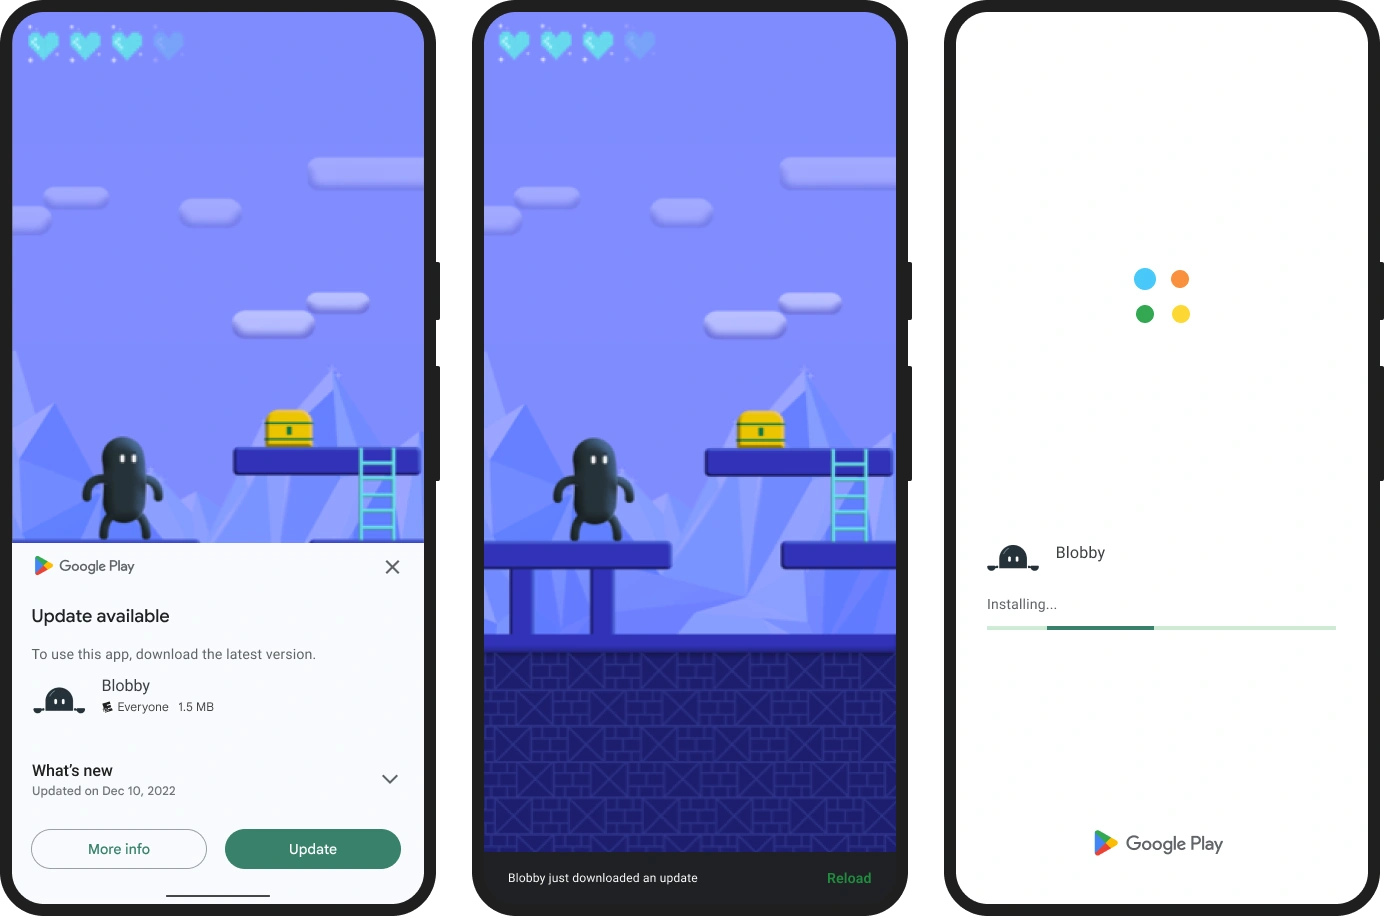
In addition to the APK stored in an S3, we are going to store an additional manifest JSON file, which will point, at any time to the latest build. (Note: In more advanced cases, you may actually decide to point to multiple APKs that feature different flavors/builds of the same app). This JSON’s location will not change and serves as an entry point. In fact, this is where S3 bucket versioning may indeed become handy, it will allow maintaining the history of that file.
On some cadence (e.x every app launch), your app itself will fetch that manifest file, compare the build/version against its own, and upon detection of a new version will prompt the user to update.
Creating the manifest file
First, let’s create an update.json file with the following values:
{
  // Current version of the app
  "versionCode": "",
  // Path to the APK file within the bucket
  "apkUrl": ""
}
The update.json file should look like the following example when properly updated:
{
  "versionCode": "2",
  "apkUrl": "https://android-app-tester.s3.amazonaws.com/app-release.apk"
}
Next, upload the update.json file to your S3 Bucket. It is advised to place it in the same Bucket where you host the APK files themselves, however, it is not a hard requirement as long as an application can access and download both files they can be stored in different locations.
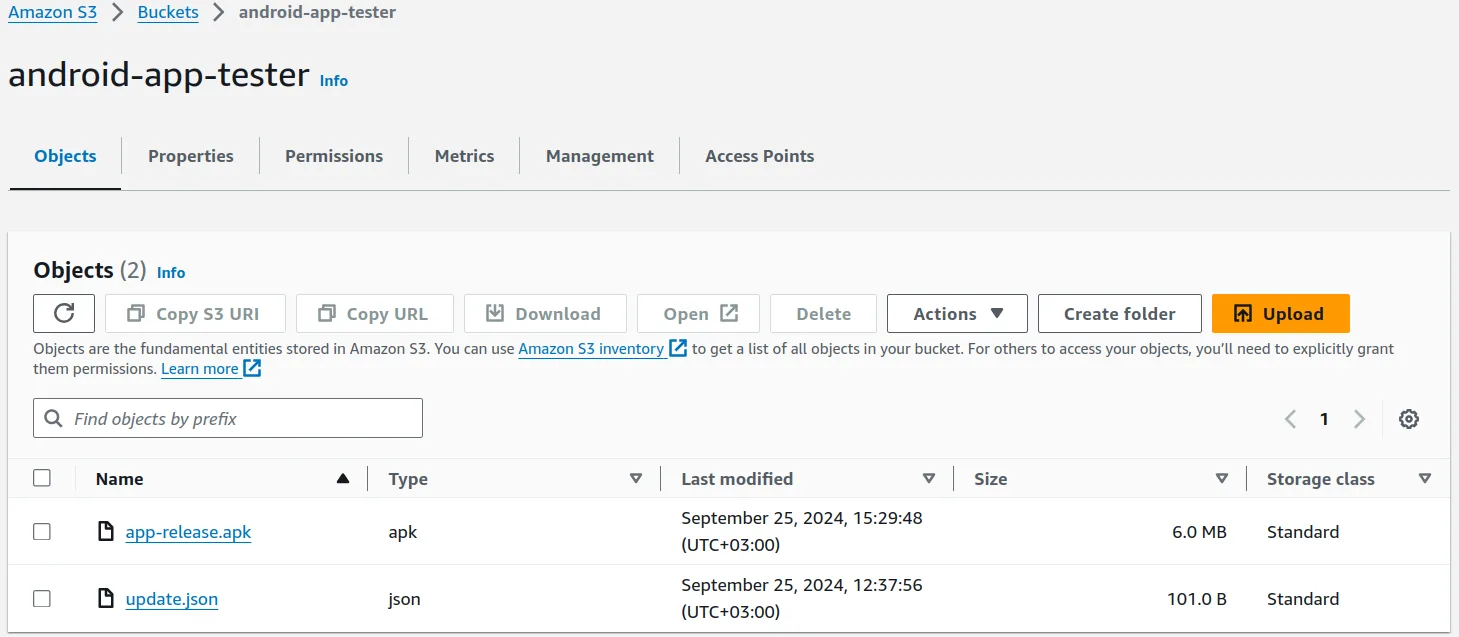
Access the update.json file and verify its URL, which is accessible from the web.
Creating the update check mechanism
In our example, we are going to rely on an OkHttp library to fetch the manifest. However, this is not a hard requirement, if your app relies on a different HTTP library, you can easily adjust it, after all, we are going to be making a few HTTP calls. Include the following in your gradle file:
implementation("com.squareup.okhttp3:okhttp:4.12.0")Your app will need internet and storage permissions to send requests and save the downloaded APK. Add these permissions to your AndroidManifest.xml file:
   <uses-permission android:name="android.permission.INTERNET"/>
    <uses-permission android:name="android.permission.WRITE_EXTERNAL_STORAGE" />
Below is the actual code that fetches the manifest update.json file, and based on the version, prompts the user to update the app.
   private fun checkUpdates() {
        lifecycleScope.launch {


                // Compare the current version code with the
                // latest version code from S3
                val latestVersionInfo = fetchVersionInfo()
                latestVersionInfo?.let { (versionCode, apkUrl) ->
                    val currentVersionCode =
                        packageManager.getPackageInfo(packageName, 0).versionCode
                         // check if the latest version is greater than the current app version
                    if (versionCode > currentVersionCode) {
                        updateDialog(apkUrl)
                    }
                }
            }
    }
   private suspend fun fetchVersionInfo(): Pair<Int, String>? {
        return withContext(Dispatchers.IO) {
          // update.json S3 URL
            val url =
                "https://android-app-tester.s3.amazonaws.com/update.json" // S3 URL for version info
            val request = Request.Builder().url(url).build()


            client.newCall(request).execute().use { response ->
             // Check if the response is successful
             // HTTP 200 OK
                if (response.isSuccessful) {
                    val jsonData = response.body?.string()
                    jsonData?.let {
                         // Extract the versionCode and apkUrl


                        val jsonObject = JSONObject(it)
                        val versionCode = jsonObject.getInt("versionCode")
                        val apkUrl = jsonObject.getString("apkUrl")
                        return@withContext Pair(versionCode, apkUrl)
                    }
                }
            }
            null
        }
    }
Make sure to call the checkUpdates method from the location that makes sense. You may decide to run it on every launch, or choose to do a smarter logic to do it less frequently, e.x no more frequently than once a day.
Upon detection of a new version on the server, the mechanism above will trigger a user prompt by calling an updateDialog function. Let’s implement that one as well:
   private fun updateDialog(apkUrl: String) {
        AlertDialog.Builder(this)
            .setTitle("Update Available")
            .setMessage("A new version is available. Would you like to update?")
            .setPositiveButton("Yes") { _, _ -> downloadAndUpdate(apkUrl) }
            .setNegativeButton("No", null)
            .show()
    }
Update dialog presents the user with two choices. A confirmation by the user triggers an actual downloading and self-installed of the APK (remember, by now we have a full path for it).
Let’s review the actual implementation of the downloadAndUpdate function below:
  private fun downloadAndUpdate(apkUrl: String) {
        // Get system DownloadManager ready
        val downloadManager = getSystemService(Context.DOWNLOAD_SERVICE) as DownloadManager
        //Download your APK
        val request = DownloadManager.Request(Uri.parse(apkUrl))
        // Add a download notification
        request.setTitle("Downloading Update")
        request.setDescription("Downloading the latest version of the app.")
        //The tester should know when the download is completed
        request.setNotificationVisibility(DownloadManager.Request.VISIBILITY_VISIBLE_NOTIFY_COMPLETED)
        // Remember to set the name of the downloaded APK
        // Try to make it the same as the S3 APK Object name
        request.setDestinationInExternalFilesDir(this, null, "app-release.apk")


        // This here sets the download ID track statuses
        downloadId = downloadManager.enqueue(request)


        // Launch a coroutine to poll the download status
        lifecycleScope.launch {
            while (true) {
                val status = withContext(Dispatchers.IO) {
                    val query = DownloadManager.Query().setFilterById(downloadId)
                    downloadManager.query(query)?.use { cursor ->
                        // Confirm a download is already available
                        // This is done based on the status
                        if (cursor.moveToFirst()) {
                            cursor.getInt(cursor.getColumnIndex(DownloadManager.COLUMN_STATUS))
                        } else {
                            null // No download found
                        }
                    }
                }


                // Possible download statuses
                when (status) {
                    // download status successful
                    DownloadManager.STATUS_SUCCESSFUL -> {
                        // Retrieve the URI of the downloaded APK
                        val uri = downloadManager.getUriForDownloadedFile(downloadId)
                        uri?.let {
                            // Launch the installer
                            installApk(it)
                        }
                        return@launch // Exit the coroutine after installing
                    }


                    DownloadManager.STATUS_FAILED -> {
                        Toast.makeText(this@MainActivity, "Download failed.", Toast.LENGTH_LONG)
                            .show()
                        return@launch
                    }


                    null -> {
                        // No download found
                        // Download not complete
                        // Continue status check
                    }
                }
            }
        }
    }


    private fun installApk(apkUri: Uri) {
        val intent = Intent(Intent.ACTION_VIEW).apply {
            setDataAndType(apkUri, "application/vnd.android.package-archive")
            // APK URI read permissions
            flags = Intent.FLAG_ACTIVITY_NEW_TASK or Intent.FLAG_GRANT_READ_URI_PERMISSION
        }
        // Start the installer
        startActivity(intent)
    }
Final testing
- Create a new APK file that includes the code samples above. Upload this APK to S3 as the first version of your application with versionCode set to 1. Download and install this APK from S3 onto your mobile device.
- Next, build a new APK with versionCode set to 2.
- Upload this updated APK to S3,
- Create a new version of the update.json with versionCode set to 2 and URL pointing to the new APK
- Open the previously installed app and an alert dialog should inform you that a new update is available.
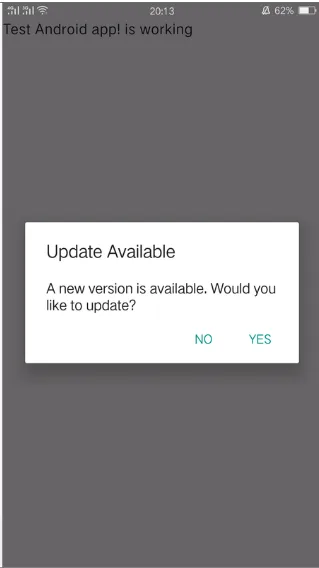
Select “YES” and a download process will start, you should receive notifications about the download status, as follows:

As soon as the download is complete, the installer will automatically launch to begin the installation of the new APK, following this process. You will be further prompted to allow that process to continue:
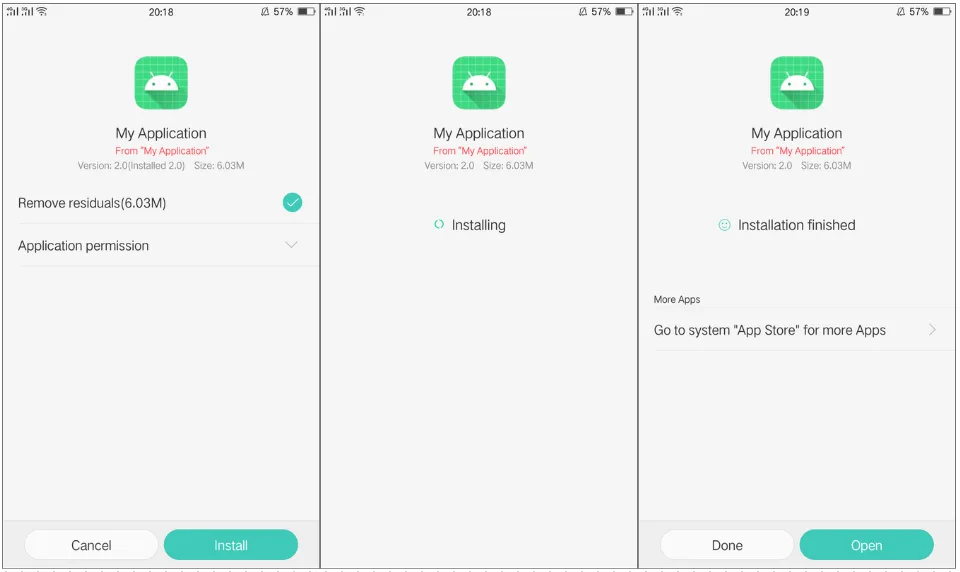
You should now have the latest version of the application installed.
Conclusion
In this guide, we’ve covered how to distribute your Android app to testers without relying on the Google Play Console. You should now understand:
- Why testing outside the Play Console can be beneficial, whether to avoid restrictions, gain more control, or speed up release cycles.
- The available distribution options, including self-hosted solutions, third-party platforms, and direct APK distribution, each with unique advantages.
- How to set up a self-hosted distribution using cloud storage, allowing you to independently manage app access.
- How to update your app after the initial installation, so testers can easily access the latest versions and provide valuable feedback.
By selecting the right distribution method, you can streamline testing, gather important insights, and provide a smoother experience for your testers.
